シェアする
シェアする
Setting Up the Swift Environment - Japanese Only
みなさまどうも。
では続きましてSwiftをプログラミングする環境を色々と整えていきましょう。
基本的にプログラムを書く前は『環境構築』なんかを行う必要があります。書いたプログラム言語を実行できるようにする環境を作る感じでございます。
これはSwiftに限らずほとんどのプログラム言語で必要な作業になりますので『環境構築』という言葉は覚えておくようにして下さい。現場でもよく使われます。
というわけで皆様はまずお手元に『比較的最近発売されたMacのパソコン』を用意して下さい。
これについては、今現在(2016年)ですとSwiftの開発環境がAppleさんが公式に提供している『Xcode』(エックスコード)というSDK(開発に特化したツール)一択になってしまっているせいだったりします。
一応Swiftはオープンソース化されているのでLinuxOSとかで実行させることもできるのですが、著者が試してみたところちょっとまだ動作が安定してなかったり、インストールが複雑だったりするのでこれから始める方向けとは言えないんですよね。
まあ今のところのSwiftはiPhoneアプリなどを開発する目的でしか使用されませんので、収益や何かの結果を出すためにSwiftを勉強しているとしたらどちらにしろMacパソコンは用意する必要があったりします。
そしてAppleさんは古いデバイスの対応を結構早めに打ち切ることが多いため、古いMacOSだと最新のMacOSや『Xcode』がインストール出来なかったりします。
そうすると最新のSwiftの記述が使えなかったり、ビルド(ソースコードなどを元にアプリなどを実行できる状態にすること)が通らなかったりしますので開発するには厳しいです。
これが比較的最近発売されたMacのパソコンが必要になるという理由です。
(´-`).。oO(MacのパソコンはWindowsOSのパソコンに比べると少々お値段が高いので...)
(´-`).。oO(これが一番ネックになっちゃうかと思います...)
もし予算的にきつかったらブラウザ越しにSwiftを試せるサービスなどもちょいちょい見かけるのでそちらで試してみるのもいいかもしれません。恐らく、基本レベルくらいの内容ならば学べるかと思います。
では改めまして皆様のお手元にMacパソコンがあると仮定して続きをやっていきたいと思います。
Macを開いたら『App Store』というアプリケーションを開いて下さい。こいつですね。

これはMacのアプリケーションとかを購入したりインストールしたりできる公式な感じのアプリになります。Mac使いの方ならば馴染みあるアプリになりますね。
そしたら検索窓で『xcode』って入力して下さい。そしたらこいつが出てくるかと思います。そのままバシッとインストールしちゃって下さい。『Xcode』は無料です。
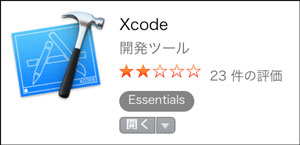
ちょっとインストールの際の注意点ですが、『Xcode』はめちゃめちゃ重いです(4GB前後)。なので外出先でテザリングなうって方は家に帰ってからやったほうがいいかもです。通信規制くらうこと請け合いです。
そしてダウンロードだけじゃなくインストールも結構時間かかるのでエッチな画像愛くるしい猫ちゃんの画像とか見ながら気長に待ちましょう。今現在(2016年9月頃)で暇つぶしをするならばアトラス様の『ペルソナ5』が特にオススメでございます。超絶面白く音楽も絵も最高なので当サイトを閲覧して下さっている皆様には是非アトラス様への売上貢献ペルソナ能力を獲得してからSwiftをやって頂きたい所存でございます。そうすることで自分でも驚くくらいの速度でSwiftが学習ができ
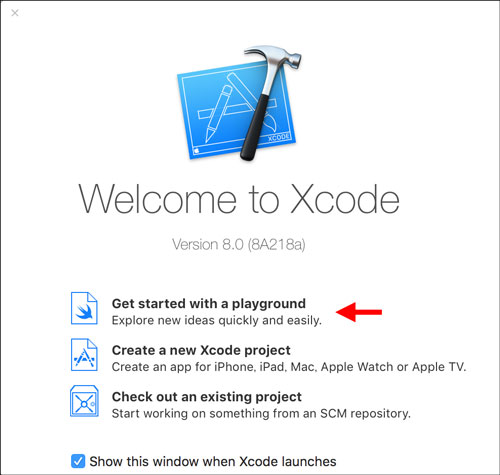
そしてインストールが完了したらそのまま『Xcode』を開いて下さい。すると以下のような画面がでてくるかと思います。そしたら矢印のところをクリックしちゃってください。『Get started with a playground』ってところですね。
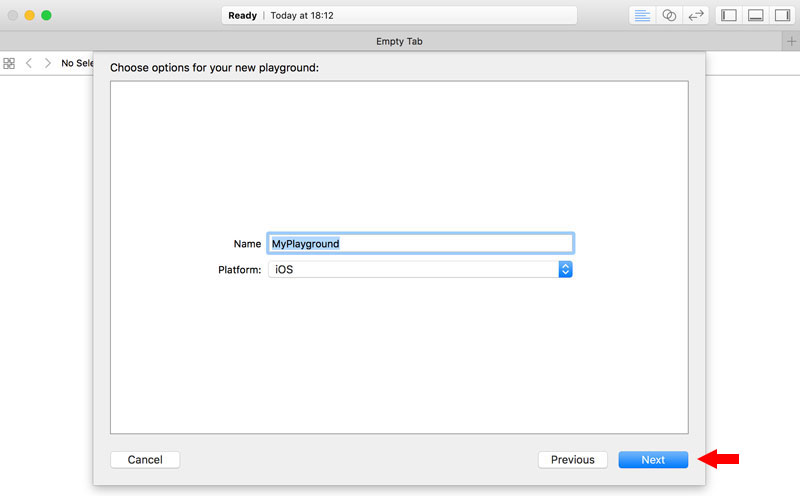
そしたら『Name』や『Platform』を選択する画面が出てきます。これは何でも構いません。恐らく『Name』には『MyPlayground』、『Platform』は『iOS』とかが選択されていると思うので特にこだわりがなかったらそのまま『Next』をクリックして次の画面に進んじゃって下さい。
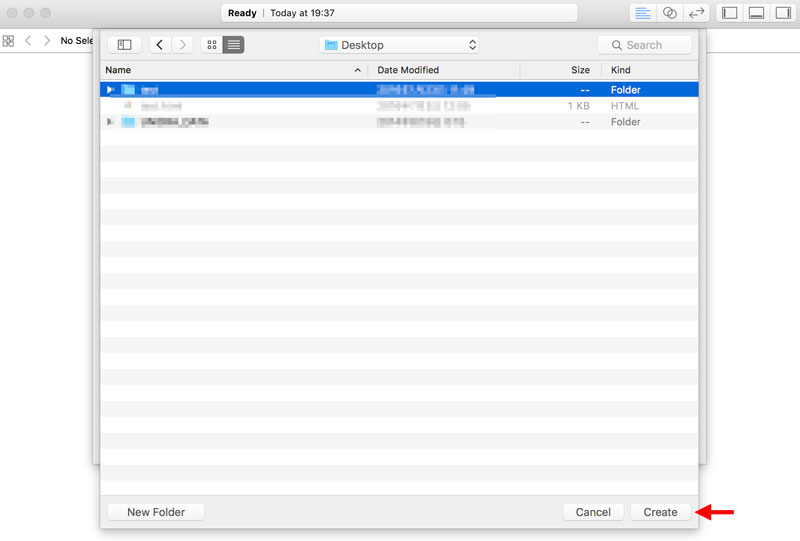
次の画面でどこにデータを保存するか聞かれます。これもどこでも構いませんので『Desktop』や『Documents』(書類)の直下などお好きなところを選んでください。そしたら『Create』をクリックして保存してしまいましょう。
保存が完了するとバシッとエディタが開いたと思いますが、ちょっとソースコードを書いてみる前に先程選択したフォルダを見に行きましょう。すると『MyPlayground.playground』みたいな名前の付いたデータが出来上がっているかと思います。
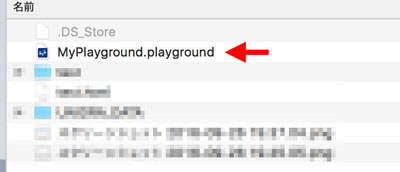
これが『Xcodeのプレイグランドファイル』になりますので再度開くときはこいつをダブルクリックすればOKです。ちなみに『.playground』って拡張子は覚えておいた方が良いかもです。こいつが『Xcode』の『playground』の拡張子になります。
※拡張子についての詳細についてはこちらへどうぞ。
ちなみに『playground』とは直訳すると「遊び場」という意味になり、勉強したりちょっとしたソースコードを試したりするために『Xcode』側で用意された環境という感じですね。
当項目ではこの『playground』を使用して勉強を進めていきますので『playground』の作り方(始め方)と開き方などはバッチリ覚えておいて下さい。
それとちょっと注意点ですが、『Xcode』は基本的に全て英語になります。なので英語が苦手な人は少し大変かもしれませんがそこは気合で頑張りましょう。
(´-`).。oO(『Xcode』はバージョンアップが非常に早く、言語変換等のバッチの作成が非常に厳しいので...)
(´-`).。oO(今後も日本語化バッチとかの配布は行われないと思います...)
さて、そしたら開いたエディタを改めて確認してみましょう。ちょっとバージョンや環境によって違いがあるかもしれませんが以下のような感じになってるはずです。
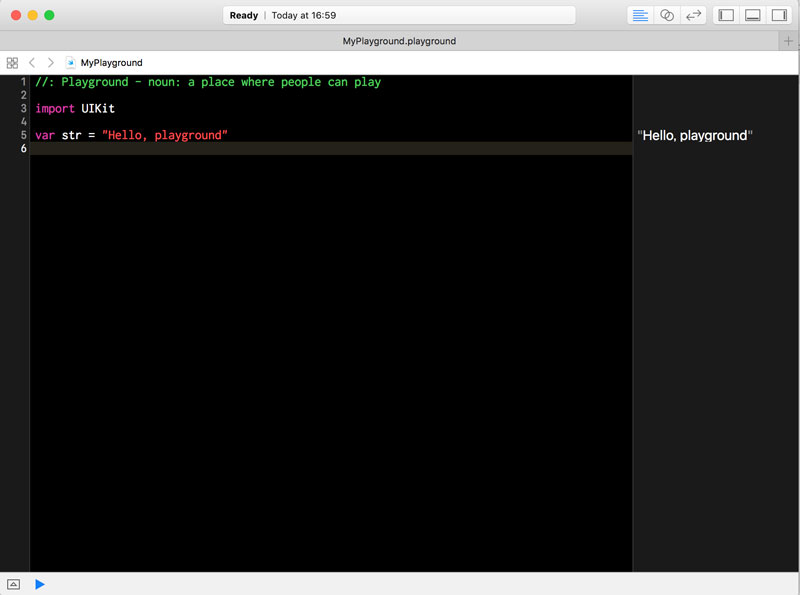
ちゃんと開けているならばこれで環境構築は完了です。お疲れ様でした。あとはこのエディタにガリガリとSwiftを書けば適当に動いてくれるはずです。
ちょっと不安があるという方もいらっしゃるかもしれませんが、次の記事で『print()』とかを使って簡単な処理を書いていきますのでそちらで動作確認しちゃいましょう。このまま進んでしまってOKです。
ではこの辺で失礼いたします。またお会いしましょう。
This article was written by Sakurama.

Author's beloved small mammal |
桜舞 春人 Sakurama HarutoA Tokyo-based programmer who has been creating various content since the ISDN era, with a bit of concern about his hair. A true long sleeper who generally feels unwell without at least 10 hours of sleep. His dream is to live a life where he can sleep as much as he wants. Loves games, sports, and music. Please share some hair with him. |
If you find any errors or copyright issues, please contact us.