シェアする
シェアする
Canvas Size and Image Resolution - Japanese Only
みなさまどうもこんにちは。
続きまして『カンバスサイズ』と『画像解像度』について進めていきましょう。
まずは『カンバスサイズ』からですね。『カンバス』というのはPhotoshopにおける作業領域のことだと思って頂ければ大丈夫です。開いてる画像のサイズはそのままで作業領域を広げたいな、といったときはこの『カンバスサイズ』を調節します。
というわけでまずは適当に画像を開いてみましょう。画像はなんでも大丈夫です。ダウンロードしたい方はこちらからどうぞ。
画像が開けましたら上のメニューバーの『イメージ』から『カンバスサイズ』とクリックしてみてください。そうすると以下のような画面が出てきます。
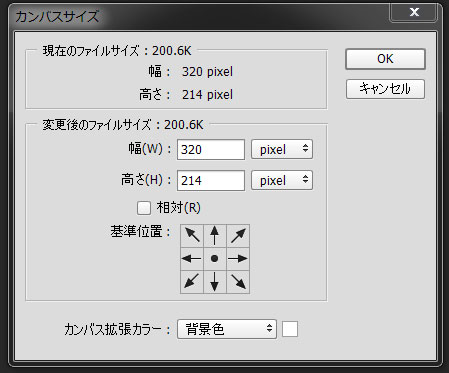
この画面でカンバスサイズを調整できます。今現在の画像のサイズから縦100px、横100pxを足してみてください。そうすると以下のようになるはずです。
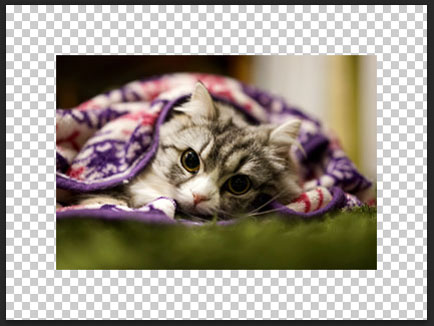
作業領域が広がっていますね。これが『カンバスサイズ』の調整となります。背景に『透明』と指定しているならば透明の領域が、背景に何かしらの色を指定している場合はその背景色が広がります。
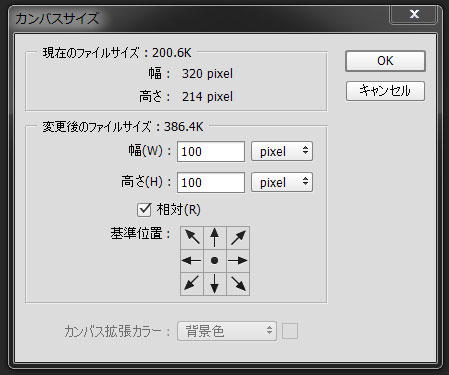
このカンバスサイズの項目の中に『相対』という部分がありますね。これにチェックを入れると追加したい分の大きさで指定することができるようになります。先ほどのように上下左右で100pxずつ大きくしたい場合は幅に100px、高さに100pxと指定すればOKです。そうすると上下左右に50pxの作業領域が広がります。
その下に『基準位置』という項目があります。これはどこを基準に作業領域を広げるか調整ができる項目です。先ほどの画像では中央を中心に広げましたが、上の中央を基準にカンバスサイズを広げると以下の画像のようになります。
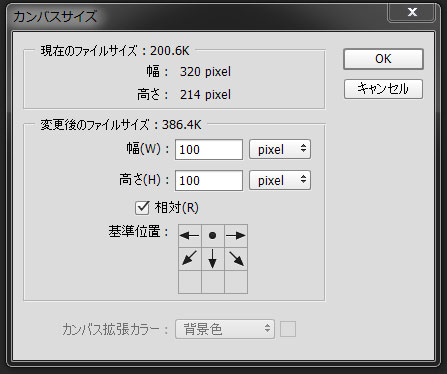
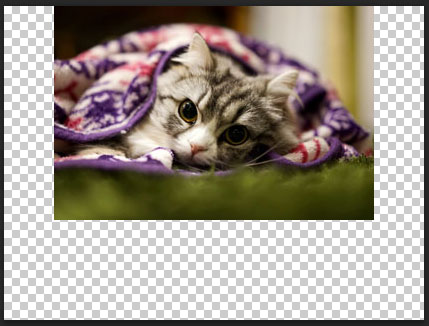
基準となる場所を変更して『カンバスサイズ』を広げたい場合はこの『基準位置』で調整するようにしましょう。そして『Web用に書き出し』を行う場合、『カンバスサイズ』の領域が全て含まれた状態で書きだされますので注意して下さい。
例えば横100px、縦100pxの画像に中央位置から100pxずつ『カンバスサイズ』を大きくして『Web用に書き出し』をすると横200px、縦200pxの画像となって書き出されます。こちらも覚えておきましょう。
では続いて『画像解像度』の項目になりますね。これは単純に開いている画像の大きさを変更することができる項目です。注意点ですが、この『画像解像度』で大きさを変更すると『カンバスサイズ』も含んだ状態で拡大縮小されます。というわけで早速やってみましょう。
また先ほどと同じようになんでもいいので画像を開いて下さい。そしたら上のメニューバーの『イメージ』から『画像解像度』を選択しましょう。そしたら以下の画面が出てきます。
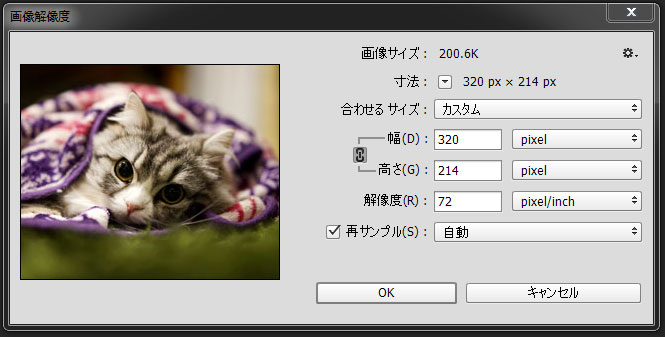
ここで画像の大きさが調整できます。項目はシンプルですね。単位は自由に選んで頂いて大丈夫ですが、ウェブ用の素材ならば『pixel』にするようにしましょう。『合わせるサイズ』というところでは『A4』サイズだったり『レターサイズ(はがきサイズ)』だったりと規定のサイズを選べるようになっています。
任意の値を入れたい場合は『幅』と『高さ』に自由に値を打ち込めばOKです。元々の画像のアスペクト比を無視して設定したければ『鎖マーク』をクリックして連動を無効にしましょう。そうすれば自由な値で大きさを設定することができます。
注意点としてウェブ用素材を作成する場合は『解像度』の数値は変更しないようにしましょう。ウェブの世界では『解像度』は基本一定である、という概念になるので『pixel』という単位を基準にした状態で、かつ『再サンプル』にチェックが入ってない場合、『解像度』を大きくすると画像のサイズも引っ張られて大きくなります。
続いて『再サンプル』という項目になりますが、まずこの右側の項目から解説していきます。これはデフォルトでは『自動』となっていますが基本的にこのままでOKです。
Photoshopで画像を拡大するときは追加する画像データ(pixel)を近似色で補って拡大する、という処理を行っているのですが、その拡大する方法を選択することができます。前回の記事の『Web用に書き出し』の解説でも登場した、『バイキュービック法』ってやつですね。最新のPhotoshopでは『ディティールを保持(拡大)』という新しい項目が追加されています。これが中々優秀で画像のテイストそのままに綺麗に拡大することができますので『自動』以外で処理を行いたい場合はこれを選択すると良いかもしれません。
さて、『再サンプル』という項目のチェックになりますが、これは入れっぱなしでOKです。この『再サンプル』という項目は主に印刷を行いたい場合に『pixelを変化させずに解像度のみを変化させたい場合』にチェックを外す必要性がでてくる項目です。
ちょっとややこしいのですが、『再サンプル』のチェックを外し解像度を2倍にすると画面上では何も変化はありませんが、印刷した際は半分の大きさになって印刷されます。この理由は1インチあたりの『pixel』が2倍の密度になっているにも関わらず『pixel』の大きさに変化がないことから、大きさが半分になって印刷されてしまうということです。ウェブ用の素材では『解像度』の項目は関係ないのでこのチェックは入れっぱなしにしておきましょう。
というわけで『カンバスサイズ』と『画像解像度』の解説は以上となります。『カンバスサイズ』は配置されている画像などの大きさを変更せずに作業領域だけを広げる設定、『画像解像度』で大きさを変更すると配置されている画像も『カンバスサイズ』も全て含まれた状態で拡大縮小されるというところだけ間違いないようにしましょう。
続いての記事では画面をスクロールさせたり拡大させたりしてみましょう。ではこの辺で失礼します。またお会いしましょう。
This article was written by Sakurama.
Author's beloved small mammal |
桜舞 春人 Sakurama HarutoA Tokyo-based programmer who has been creating various content since the ISDN era, with a bit of concern about his hair. A true long sleeper who generally feels unwell without at least 10 hours of sleep. His dream is to live a life where he can sleep as much as he wants. Loves games, sports, and music. Please share some hair with him. |
If you find any errors or copyright issues, please contact us.