シェアする
シェアする
Crop Tool and Trimming - Japanese Only
みなさまどうもこんにちわ。
ここまでとてもお疲れ様でした、次回が総まとめとなりますのでPhotoshop入門編は当記事が最後の項目となります。
では『切り抜きツール』と『トリミング』についてやっていきましょう。
『切り抜きツール』はその名の通り今現在表示している画像(レイヤー)をくり抜くツールです。前の記事で解説した選択範囲でくり抜く挙動と似ていますが、切り抜きツールではカンバスごと切り抜く感じになります。
では適当に画像なんかをPhotoshopで開いてみてください。開けましたら左側のツールバーに注目してみましょう。真ん中の上あたりに以下のアイコンがあるかと思います。

これが切り抜きツールです。そしたら切り抜きツールを選択した状態で画像(レイヤー)の上をクリックしてみましょう。すると以下のような状態になるはずです。
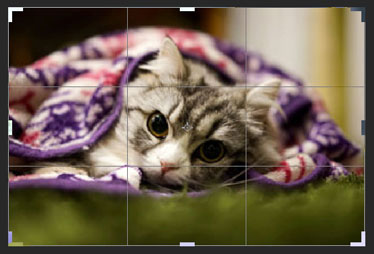
枠がでてきましたね。切り抜きツールはこの枠にそって切り抜いてくれます。枠の縁をドラッグすれば枠の大きさを変更できますので適当な大きさにしてみましょう。
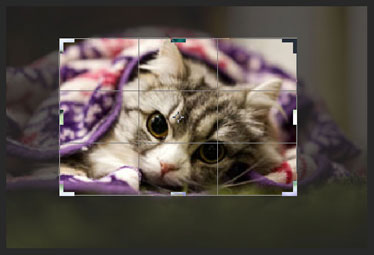
切り抜きツールで切り抜きする際にでてくる枠は『切り抜きボックス』といいます。
仕事現場などではほぼ使用されない言葉ではありますが、たまにPhotoshopの技術書か何かで登場することもありますので何となく覚えておくと良いかもしれません。
繰り抜き位置が決まったら右上に注目してください。またマルバツが出てきていますのでマルをクリックすれば切り抜きを確定させることができます。もしくは『Enter』(return)キーでも確定させることができます。

というわけで確定してみましょう。以下の画像のような感じでちゃんとくりぬけましたらOKでございます。

最新のPhotoshopCCではレイヤー側を動かして切り抜き位置を調節していますが、昔のPhotoshopでは切り抜きボックスの方を動かして調節をしていました。
昔の操作に戻したい場合はオプションバーの歯車マークをクリックして『クラシックモードを使用』という項目にチェックを入れればOKです。
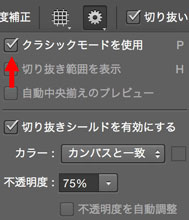
古い時代のPhotoshopから触っているせいか分かりませんが個人的にはクラシックモードのほうが使いやすいです。ちょっと操作に違和感があるな、と感じたらクラシックモードを試してみると良いかもしれません。
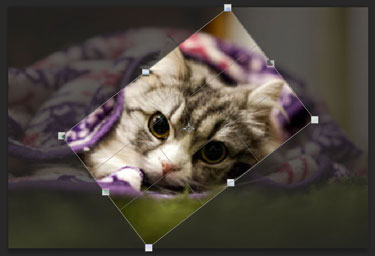
切り抜きボックスの外あたりをドラッグするとボックスを回転させることができます。こちらも覚えておきましょう。
切り抜く大きさを指定したい場合はオプションバーから設定することができます。

比率を固定して切り抜きしたい場合は左側のプルダウンを『比率』にして右側の数値を指定します。その際は単位はいりません。

大きさを指定して切り抜きしたい場合は左側のプルダウンを『幅×高さ×解像度』に設定して大きさを指定します。ウェブ素材を作成する場合は解像度の項目は無視してしまってOKです。適当に『72』あたりにしておきましょう。

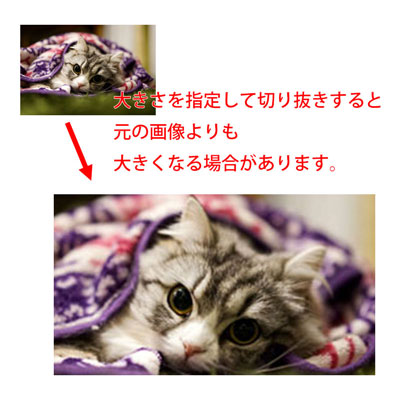
尚、大きさを指定した切り抜きの処理は『指定された位置を切り抜いた後で指定された大きさにリサイズされる』という流れになりますので注意です。
例えば『横幅100px、縦幅100px』の画像の一部分を『横幅1000px、縦幅1000px』で指定して切り抜くと、切り抜いた後のサイズは『横幅1000px、縦幅1000px』となります。元々のサイズより大きくなっちゃってますね。この辺は使っていくうちに体感していくかと思います。
デフォルトの状態の切り抜きツールで切り抜きを行うと存在する全てのレイヤーがその枠の大きさで切り抜かれ、カンバスサイズもその大きさになります。
切り抜きツールは作業領域全てを切り抜いているようなイメージになりますね。
ちなみに切り抜いた各レイヤーの外側の領域を残して切り抜きしたい、つまりカンバスのみ切り抜きしたいといった場合はオプションバーの『切り抜いたピクセルを削除』のチェックマークを外して下さい。そうするとカンバスのみが切り抜きされます。

切り抜いたあとにバウンディングボックスなどで確認してみると各レイヤーが切り抜かれていないのが確認できると思います。ちょっと言葉で説明するのが難しいのですが試してみるとすぐに体感できるかと思います。
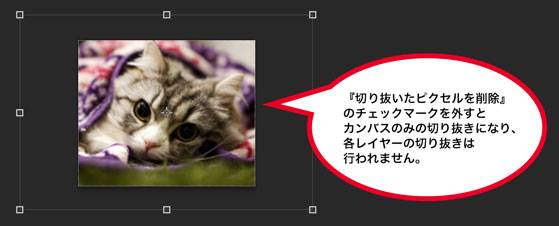
その際に大きさの指定があった場合は全てのレイヤーをその比率で拡大縮小した上でカンバスのみが切り抜きされるという流れになります。
この『切り抜いたピクセルを削除』という項目はかなり最近のPhotoshopで初めて実装された機能なのですが非常に強力なので覚えておくと良いかもしれません。
尚、特定のレイヤーのみを切り抜きしたい場合は選択範囲を使った切り抜きを行うと良いです。用途によって使い分けていきましょう。
※こちらを参照
というわけでこれが切り抜きツールの基本的な使い方です。続きまして『トリミング』という機能を使ってみましょう。
トリミングを行えば余白を自動で計算し、その大きさで切り抜いてくれるのでとても便利です。
そもそもの『トリミング』とは画像の一部を切り抜く加工の事を指す言葉です。なので切り抜きツールも一種のトリミングになりますね。
ただ、Photoshopではトリミングと切り抜きツールは別の扱いになっています。トリミングという名前の機能が別に用意されている感じです。
では早速使ってみましょう。Photoshopで適当に画像か何かを開いてカンバスサイズを適当に大きくして周りに余白を作ってみてください。以下のような感じですね。
※カンバスサイズについてはこちらを参照
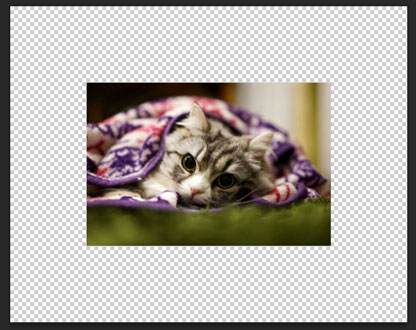
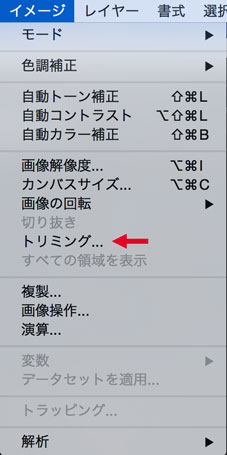
そしたら上のメニューバーの『イメージ』の中に『トリミング』という項目があるのでこちらをクリックしてみてください。
すると以下のダイアログが出てきます。
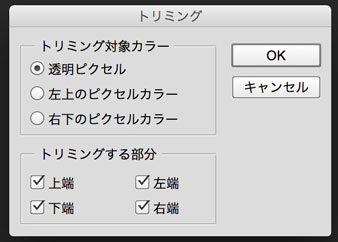
各項目をみていきましょう。『トリミング対象カラー』とはどの色を基準に切り抜きを行うか設定できる項目になります。『透明ピクセル』を選ぶと透明部分を対象になり、『左上のピクセルカラー』を選ぶと左上のピクセルの色が対象になります。例えば表示している画像の左上が赤色だったらその赤色を基準に自動で切り取ってくれる感じです。『右下のピクセルカラー』も同じくです。
その下のトリミングする部分というのはトリミングする部位を指定できる項目になります。例えば上下だけトリミングしたい場合は『上端』と『下端』にチェックを入れ、他のチェックを外せばOKです。
さて、トリミングする方法が決定したら『OK』をクリックしてみましょう。先ほどの画像を『透明ピクセル』、『上端』、『下端』、『左端』、『右端』で切り抜くと以下のようになります。

『上端』、『下端』のみで切り抜くとこんな感じですね。
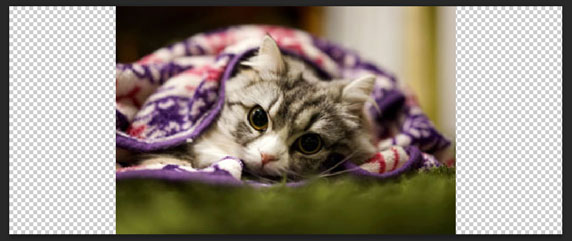
これがPhotoshopのトリミング機能の使い方です。簡単な操作でさくっと切り抜いてくれるので操作感は中々良い感じかと思います。切り抜きツールと合わせて使いこなしてしまいましょう。
というわけで切り抜きツールとトリミングに関する基本的なところは以上となります。
そしてPhotoshop入門編も以上です。ここまでお付き合い頂きありがとうございました。Photoshopの操作にも大分慣れてきたのではないでしょうか。Photoshopは少々操作感にクセがあるので最初は大変かもしれませんが慣れてしまえばこっちのものです。Photoshopを使いこなせれば画像生成や画像加工はお手の物といった感じになりますのであなた様の人生の手助けになること請け合いです。
次の記事では総まとめをやっていきたいと思いますので忘れてしまった項目などあったら再確認しちゃってください。
ではまたお会いしましょう。
This article was written by Sakurama.

Author's beloved small mammal |
桜舞 春人 Sakurama HarutoA Tokyo-based programmer who has been creating various content since the ISDN era, with a bit of concern about his hair. A true long sleeper who generally feels unwell without at least 10 hours of sleep. His dream is to live a life where he can sleep as much as he wants. Loves games, sports, and music. Please share some hair with him. |
If you find any errors or copyright issues, please contact us.