シェアする
シェアする
Adding Text - Japanese Only
クノールさんとこのカップスープって美味過ぎると思いませんか?
というわけでみなさまどうも。
続きましてPhotoshopでの『文字の打ち込み』をやっていきましょう。
ではまたPhotoshopを開いて適当に新規ファイルを作成してみてください。画像をPhotoshopで開いても大丈夫ですが、文字が見えにくくなってしまうので背景は透明色か白色にしておくと良い感じです。
開けましたら左側のツールパネルに注目してください。真ん中の下あたりに以下のアイコンがあるかと思います。

これが『横書き文字ツール』です。その名の通り横方向に文字を入力するためのツールで、Photoshopではこのツールを使って文字を入力します。
では使い方をみていきましょう。『横書き文字ツール』を選択した状態でレイヤーの上あたりを適当にクリックしてみてください。そうすると文字入力モードになりますのでそのまま適当に文字を入力してみましょう。
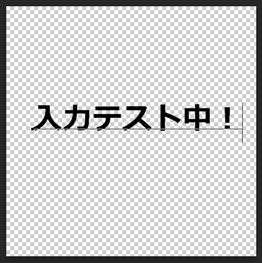
文字の入力が終わりましたらオプションバーの右側に注目しましょう。右上のあたりですね。以下のマルバツがでてきているかと思います。
入力した文字でOKだったらマルを選択、ダメだったらバツを選択すれば元の状態に戻ります。
注意点として『Enter』(return)キーを押しても『決定』にはならず『改行』扱いになるので気をつけて下さい。文字の入力を確定したい場合はマルバツのマルを選択するか、もしくは『Ctrl』(command)を押しながら『Enter』(return)キーで確定できます。『Ctrl』(command)を使用したショートカットキーもあわせて覚えておくと良い感じです。
文字を修正したい場合は『横書き文字ツール』を選択した状態で入力した文字のところを再度クリックしてみましょう。そうすると入力モードになりますのでそのまま修正すればOKです。
さて、では入力する文字の設定を変更する方法をみていきましょう。『横書き文字ツール』を選択した状態で上のほうに注目です。上にあるオプションバーが以下のように表示されているはずです。

こちらで『フォントファミリー』(フォントの種類)や『大きさ』、『色』、『字幅』などの設定が変更できます。
まずは『フォントファミリー』の変更からみていきましょう。以下のプルダウンメニューからフォントファミリーを選択できます。

こちらに出てくる項目はお使いのPCにインストールされているフォントの一覧となります。フォントの種類を増やしたかったら新しいフォントをPCにインストールすればOKです。ちゃんとPhotoshop上でも認識されます。
続いてフォントの大きさと太さを設定する項目です。以下の部分になります。

注意すべきはフォントの太さですね。上記の画像の場合だと『B』と書いてあるプルダウンで太さを設定できますが、現在選択しているフォントに太字のデータが存在しない場合は文字データとしての太さ調節はできません。
以下は『ヒラギノ丸ゴPro W4』というフォントを選択していますが文字データとしての太さが一種類しか用意されていないためPhotoshop上でも太さは選択できません。以下の画像のように選択できない状態になります。

続いてその右側にある以下の項目をチェックしてください。
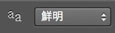
こちらでは文字の『アンチエイリアス』を調整することができます。この項目とかx軸、y軸とかもろもろを調整すると文字がすんごく綺麗になったりしますが、ちょっと複雑なのでとりあえずは『鮮明』とかにしておけば問題はありません。
『アンチエイリアス』とは文字や画像などの縁を滑らかに変化させることを指します。
文字データをそのままディスプレイに出力した場合、コンピューターはそのディスプレイで表示できるピクセル(ドット)以下の細かい描写ができないため縁がギザギザになっちゃったりします。
そのままでは文字が汚くなってしまい読みづらいので文字の縁を背景に溶け込ませたり、色を調整したりという処理が行われます。それが『アンチエイリアス』です。
以下にアンチエイリアスをかけた文字とかけてない文字を用意したので確認してみてください。上がアンチエイリアスあり、下がアンチエイリアスなしです。かなりの違いがあるかと思います。
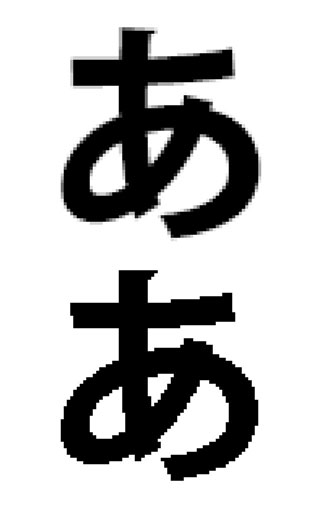
アンチエイリアス処理で有名なのはMacOSです。今お手元にMacOSとWindowsOS(Linux)のマシン両方をお持ちでしたら文字を見比べてみてください。MacOSは文字がすごく綺麗ですよね。この差はアンチエイリアス処理の違いから生まれています。
続いて以下のような項目があるかと思います。

こちらは入力するテキストを『左揃え』にしたり『中央揃え』にしたりという位置を調整する項目になります。
そして以下の項目で色を変更することができます。

上記の色がついた部分(上記の画像だと赤色の部分)をクリックしてみてください。ここでお好きな色を選択すればその色で文字が入力できます。テキストの位置と色については特に注意点はないので目的に応じてお好きな設定にしてしまって大丈夫です。
というわけで文字入力の基本的な操作はこんな感じになります。
ちょっと注意点になりますが、元々入力されている文字の設定を変更したい、といった場合にはそのテキストを選択状態にしてから設定を変更する必要があります。
例えば以下の文字を赤色に変更したい場合は『横書き文字ツール』を選択し、そのあとに文字部分をクリックして文字入力状態にします(テキスト入力のカーソルが点滅します)。
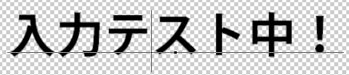
その状態で文字をドラッグ(『Ctrl』(command)+『A』キーのショートカットでも可)して選択状態にし、
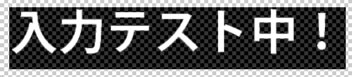
この状態で上のオプションバーから赤色に変更すれば選択した文字部分にその設定が反映されます。
Photoshopの操作に慣れないうちは『文字を選択状態する』という工程を忘れてしまい
「文字設定を変更したのに反映されないよ(;´Д`)」
という状態になってしまいがちですので注意しましょう。
文字入力状態にしつつ、その文字全てを選択状態にしたい場合はレイヤーパネルの以下の部分をダブルクリックすればOKです。

Photoshopでは縦方向に文字を入力するためのツールがあります。ツールパネルにある『横書き文字ツール』をそのまま長めにクリックしてみてください。すると以下のように展開されるかと思います。
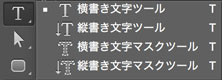
その中の『縦書き文字ツール』を選択しましょう。そうすると縦方向に文字を入力できます。使い方は『横書き文字ツール』とほぼ同じです。
文字を移動、変形したい場合は『移動ツール』を使用すればOKです。
※移動ツールについてはこちらへどうぞ
バウンディングボックスも使用できますので文字を歪せたい場合はバウンディングボックスを使用すると良いです。
尚、バウンディングボックスなどで文字を変形するとフォントの大きさなどもそれに引っ張られて変更されますのでそこは注意してください。
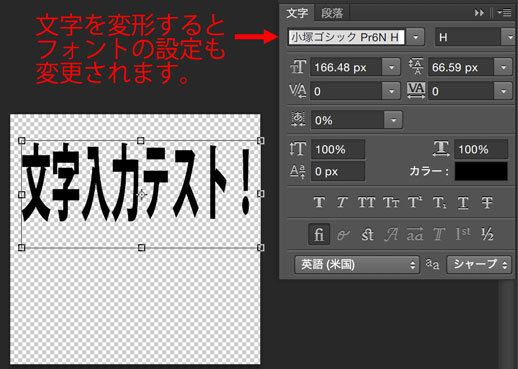
文字の設定は『文字パネル』でも変更することが可能です。文字パネルではオプションバーよりももっと細かい設定を行うことが可能です。
文字パネルの出し方はPhotoshopの上部のメニューバーから『ウィンドウ』を選択し、その中の『文字』という項目をクリックしてみてください。
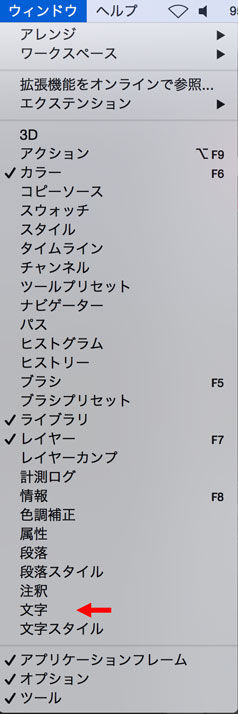
すると右側に以下のようなアイコンが出てきます。

この上のアイコンをクリックすれば文字パネルを出すことができます。以下のパネルですね。
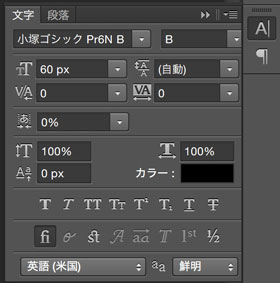
こちらでは行間や文字の詰め具合を調節したり、文字データに太字が用意されていない場合でも文字を無理やり太字に加工したりと色々な調節ができますのでより細かい調整が必要な場合はこの文字パネルを使っていきましょう。
文字パネルは項目が多いので詳しい解説はまた別の記事でやっていきたいと思います。
というわけで文字入力の基本的なところはこんな感じです。Photoshopでは文字を使った様々な加工や素材作成ができますので他の記事でもまた紹介していきたいと思います。
続いての記事では切り抜きとトリミングをやっていきたいと思います。引き続き頑張っていきましょう。ではー。
This article was written by Sakurama.
Author's beloved small mammal |
桜舞 春人 Sakurama HarutoA Tokyo-based programmer who has been creating various content since the ISDN era, with a bit of concern about his hair. A true long sleeper who generally feels unwell without at least 10 hours of sleep. His dream is to live a life where he can sleep as much as he wants. Loves games, sports, and music. Please share some hair with him. |
If you find any errors or copyright issues, please contact us.